Sun Shade Sails - Defeat the Heat With Style
Sun shade sails (also called ‘shade sails’ or ‘sun sails’) have become increasingly popular over the last several years, and for good reason. Not only do they look great, but they are one of the most effective and affordable solutions for bringing shade to an outdoor space - big or small, permanently or temporarily.
With global temperatures progressively rising, the need for shade structures is more important than ever. Not only do they make outdoor spaces more comfortable, but they also protect you from the damaging effects of excessive UV exposure.
Despite their importance and growing popularity, there’s few quality resources designed to comprehensively educate people about this exciting option. That’s why we at ColourTree decided to produce this guide to put everything you need to know about shade sails in one place. Let’s get started by discovering the unique advantages they have to offer.
Shade Sail Benefits
Shade sails have a unique set of attributes that makes them particularly advantageous for shading an outdoor area. As opposed to other shading structures (like pergolas, umbrellas, and covered porches), shade sails are made out of a breathable material that allows hot air to escape while still blocking up to 98% of harmful UV rays. Because of this, shade sails can make an area up to 25% cooler than solid shade structures, and reduce the ambient temperature by at least 10°.
But the shade sail’s cooling power doesn’t stop at the outdoors - they can also help you stay cool inside. By inhibiting solar radiation, the solar heat gain that would otherwise contribute to higher indoor temperatures is reduced . This makes you less reliant on air conditioning on those hot summer days, which can save you money on electricity.
Aside from their functional attributes, shade sails are also:
- Attractive: Shade sails can create an aesthetically unique vocal point to your outdoor living space. With so many creative arrangements and styling options to choose from, shade sails provide a look that can’t be matched by any other shade structure.
- Versatile: They can be used to cover a customized area with a huge amount of creative license. As we’ll see later, there is a variety of possible arrangements you can use to cover any space you could imagine.
- Easy to install: Shade sails are easy to install, move, and remove by yourself which makes experimenting with different locations and arrangements possible. They can also be used to provide temporary shade for an outdoor event (like a party) to be easily taken down afterward.
- Affordable: Shade sails are a fraction of the cost of other shade structures that provide comparable shade coverage. This makes their value truly unmatched.
Are Sun Shade Sails Waterproof?
We know that shade sails are resilient against the sun, but what about water? The waterproof rating will largely depend on the type and thickness of the material it’s made out of. Some standard shade sails are made out of regular shade cloth that provides little, if any, protection against the rain.
On the other hand, the High Density Polyethylene (HDPE) that some shade sails are made from acts like a thin water-resistant membrane. Waterproof sun shades are made from thicker HDPE material with an additional waterproofing treatment that doesn’t compromise its porous, heat seeping characteristics.
As long as your sail is made with HDPE fabric, installing your shade sail at an angle or with a twist will also help water run off your sail, even if it’s not rated as “waterproof”. Ensuring your shade sail is installed with the proper tension (with no sagging or wrinkles) will also help prevent water from pooling in the center of the fabric.
How Long Do Shade Sails Last?
The lifespan of a shade sail largely depends on the materials it’s made out of, but the general estimate is 3-10 years. HDPE fabric is notorious for its longevity, with the heavier fabrics (as measured in grams per square meter, or ‘gsm’) lasting longer than lighter fabrics. The most common gsm ratings for shade sails are between 160 gsm and 260 gsm, and most warranties reflect the thickness of the material used. However, the first point of failure isn’t usually the fabric, but the seams. Consequently, selecting a shade sail made with reinforced seam edges can expand the longevity of your sail considerably.
What is the Best Sun Shade Sail For You?
Sun shade sails come in two primary shapes: square/rectangular and triangular. Each has their strengths and weaknesses, and the one you choose depends on whether you are using it primarily for form, function, or a combination of the two.
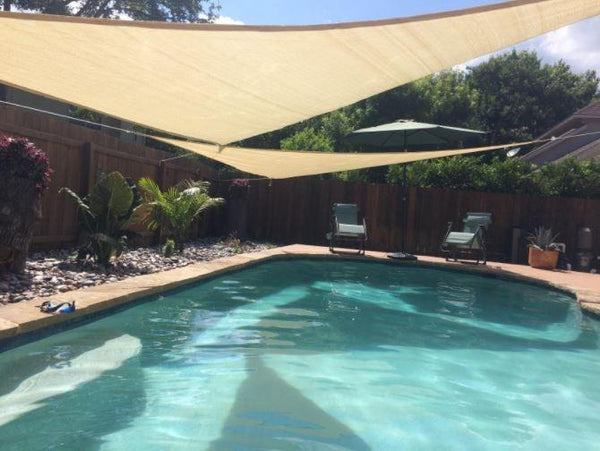
Sun Shade Sail Triangle

Not only are they pleasing to look at, but triangular shade sails are the perfect choice for shading smaller areas. Because of their smaller size they’re also perfect as temporary outdoor shading solutions, as opposed to the larger rectangular sails (see below) that might require more sturdy supports. Triangles are also more popular as aesthetic fixtures for outdoor living spaces, making them an excellent focal point in your exterior design layout. While square and rectangular shade sails are better suited for larger areas, multiple triangles can be used in a wider variety of creative layouts.

Sun Shade Sail Squares & Rectangles

If you’re looking to shade a large outdoor area, square or rectangular sails might be your best bet. Just be aware that because of their larger size, they may require sturdier support structures than their triangular counter-parts. You can also increase the strength of these sails by creating a three-dimensional effect like in a hypar design (see below) or by attaching one corner significantly higher than the other corners. Not only does this make the sail stronger, but it provides a distinct and stunning look. Just like with triangular sails, you can also install squares at a slight vertical incline to prevent moisture accumulation and sagging.
Top 5 Sun Shade Design Layouts
The diverse design layouts available with square and triangular sails is truly remarkable. Below are the five most common layouts used in outdoor living spaces.
- Rectangle or Square Hypar Design

The parabolic hypar design using a single square or rectangular shade sail is incredibly popular since it combines all the best shade sail elements: it looks great, it provides excellent shade coverage, and it’s more resistant to wind and rain than a flat, 2-dimensional layout. To accomplish this effect, you simply need to have two opposing corners secured at a low point the same distance off the ground, and the other two opposing corners secured at a higher point the same distance off the ground.
- Multiple Squares or Rectangles

Combining multiple square or rectangular shade sails is a great way to shade a large area. To do so, you can either install the two shade sails side-by-side, or with a slight overlap. Overlapping the shade sails has the benefit of avoiding gaps in shade coverage that would otherwise exist with a side-by-side installation. When overlapping, it’s recommended to maintain at least a 12 inch distance between the sails to avoid damaging contact chafing between the fabrics.
- Slanted Triangle

Another attractive option is the slanted triangle. The angle provides aesthetic appeal while also allowing moisture run-off. It’s generally recommended to have a slope of at least 15 degrees to allow for the best run-off.
- Multiple Triangles
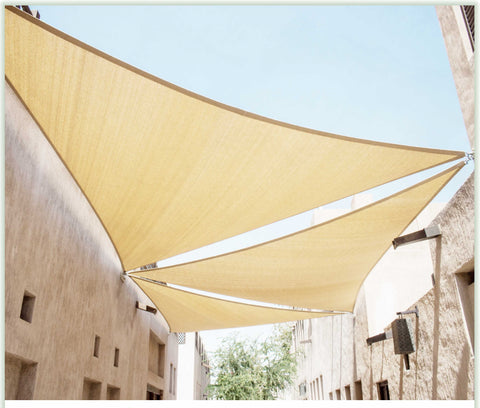
Multiple triangles can create unique, beautiful designs capable of covering spaces a single triangle or square couldn’t. Just like the squares and rectangles, you can attach them side-by-side or with a slight overlap. The same overlapping considerations apply for the triangles: maintain at least a 12 inch distance between the sails to avoid chafing.
There are several design layouts to choose from:
- You can create a polygon by having two triangles facing one direction that sandwich a center triangle facing the opposite direction
- You can also create an eye-catching folding fan effect by staggering multiple triangles.
- Rectangle/Square & Triangle Combinations

Combining squares and triangles creates a distinct appearance that can shade large, customized areas.
- You can create a pentagon shape by installing a triangular sail atop a square
- You can hide the seam of two side-by-side squares with an overlapping triangle in the center
- Or anything else your imagination comes up with.
Installing Your Shade Sail
Now that you’ve seen the various ways shade sails can be used to create gorgeous outdoor coverings, let’s take a look at how to install them. As we’ve seen, one of the advantages of shade sails is how easy they are to set up. While that’s true, there are still specific steps that need to be performed, and installations can vary in complexity depending on the size of your sails and your desired design layout.
It’s also important to look into your area’s building codes or HOA requirements before installing your sail. It may also be wise to check with a building engineer to determine the specific requirements for the supports you use to withstand certain weather conditions.
Shade Sail House Mounts
It's always ideal to use pre-existing structures to attach your shade sail to. This way, you avoid having to go through the extra effort and expense of installing additional supports. Perhaps the best pre-existing structure is your house, and the fascia board is an excellent candidate for the job. If you plan on going this route, you should ensure the fascia is sufficiently reinforced with screws (not nails) to the rafters, and potentially further reinforced with structural support brackets like L-brackets or hurricane hangers. The shade sail attachment point should also be on or near where the rafter meets the fascia to ensure optimal strength.
Sun Shade Sail Pole Mounts
If there are no pre-existing structures to attach your sail from, you may have to install support posts. You should use at least 6x6 treated lumber, or 3” (minimum) steel pipe. The specific length will depend on how high in the air you want your sail, and how large your post holes (called ‘footings’) need to be. The general guideline for footing depth is half the exposed post length. So if you need your post to be 12’ above the ground, your footing depth needs to be 6’. After you’ve figured out your footing depth, you simply add that figure to the exposed post length to determine the overall post size. In our example, we would need an 18’ post (12’ + 6’).
Before starting your post holes, consider contacting your local utility companies to have them come out and mark the locations of your gas and water lines. Most companies perform this service free of charge.
When you’re ready to start digging, a post hole digger can be used to make the task significantly easier. They’re easy to find and relatively inexpensive, and will be well worth the investment if you plan on installing multiple support posts. Whichever way you dig the footings, make sure they’re at least 12” wide and have plenty of concrete on hand to secure the posts in place.
Hardware

There are several options you can use in securing your shade sail to your desired anchor points, such as:
- Chain
- Wire
- Rope
- Steel Cables
- Turnbuckles
- Snap hooks
- Shackles
- Pad eyes
- Eye bolts and screws
You can either purchase these items independently, or can buy kits specifically made for triangular or square/rectangular shade sails. Whatever route you choose, be sure that the hardware is rated to withstand any adverse weather conditions specific to your area. Again, contacting an engineer for this information may be a wise choice.
Tensioning the Shade Sail
Establishing proper tension at the anchor points is key in preventing damage caused by wind or rain. With hardware in hand, securely fasten them to your chosen anchor points facing towards the center of the sail. Next, connect one corner of the shade sail directly to one of the anchor points. For the remaining corners, manually stretch them out as taught as possible by hand, with a rope, or with the aid of a ratchet strap.
The last corner is the trickiest since all other corners will be tensioned. You can either recruit someone to help you, or you can use a heavy-duty ratchet strap. In any case, pull it as close to the anchor point as possible and secure it to the last piece of hardware.
Ensure that all the corners are equally and properly tensioned, with no sags or wrinkles in the fabric. If you’re using turnbuckles as part of your hardware package, fine-tuning the tension will be easy.
Congratulations! You’re successfully installed your very own sun shade sail that will provide comfort, protection, and satisfaction for many years to come.
Transform Your Outdoor Living Space Today
Sun shade sails are an attractive, affordable, and easy-to-install way to transform any outdoor living space into a relaxing oasis. They offer an excellent alternative to pergolas, covered porches, awnings, and umbrellas; often looking and working better than any other shade structure. With several design layouts to choose from, you can easily customize your shade sail to accommodate your specific needs and tastes.
If you want a shade sail made of the highest quality materials that will bring you joy and comfort for several years to come, check out Colour Tree’s wide selection of premium quality shade sails today.
We have shade sales on our Rooftop Bar at The Vendue I am looking to replace. Do you sell shade sails with the cut out slots to allow wind to pass through?
If we have the dimensions of our driveway, would you be able to help us cover it with a combination of triangle sails? We are struggling to figure out the sizes we need.
How do you use the 12’ cables in installation?
Are there any diagrams for installation?
larger sizes and grommet spacings offered custom sizing available.